【SpringMVC】SpringMVC基础教程(8)
前言:
本文内容:ssm整合修改删除书籍、ssm整合新增搜索功能、Ajax体验
推荐免费SpringMVC基础教程视频:【狂神说Java】SpringMVC最新教程IDEA版通俗易懂_哔哩哔哩_bilibili
ssm整合:修改删除书籍
-
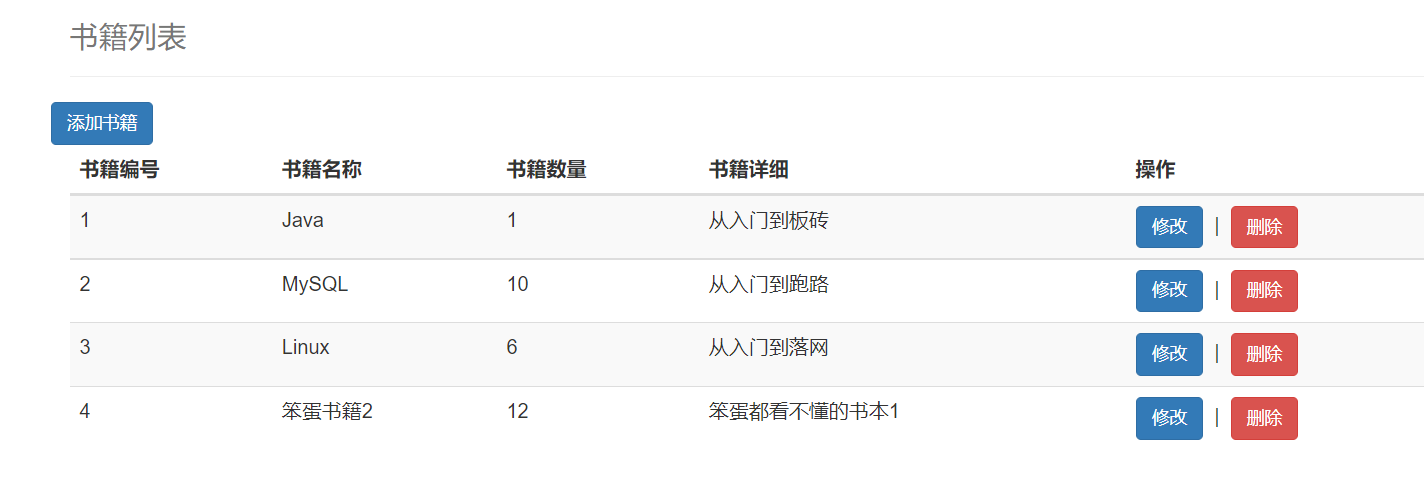
修改书本列表页面
allBook.jsp1
2
3
4
5
6
7
8
9
10
11
12
13
14
15
16
17
18
19
20
21
22
23
24
25
26
27
28
29
30
31
32
33
34
35
36
37
38
39
40
41
42
43
44
45
46
47
48
49
50
51
52
53
54
55
56
57
58
59
60
61<%@ taglib prefix="c" uri="http://java.sun.com/jsp/jstl/core" %>
<%@ page contentType="text/html;charset=UTF-8" language="java" %>
<html>
<head>
<title>书籍查询</title>
<%-- bootstrap CSS--%>
<link href="https://cdn.staticfile.org/twitter-bootstrap/3.3.7/css/bootstrap.min.css" rel="stylesheet">
</head>
<body>
<%--使用BootStrap 需要导入--%>
<div class="container">
<%-- 栅格系统--%>
<div class="row clearfix">
<div class="col-md-12 column">
<div class="page-header">
<h1>
<small>书籍列表</small>
</h1>
</div>
</div>
<div class="row">
<div class="col-md-4 column">
<a class="btn btn-primary" href="${pageContext.request.contextPath}/book/toAddBook">添加书籍</a>
</div>
</div>
</div>
<div class="row clearfix">
<div class="col-md-12 column">
<table class="table table-hover table-striped">
<thead>
<tr>
<th>书籍编号</th>
<th>书籍名称</th>
<th>书籍数量</th>
<th>书籍详细</th>
<th>操作</th>
</tr>
</thead>
<tbody>
<%-- 从list中遍历--%>
<c:forEach var="book" items="${list}">
<tr>
<td>${book.bookID}</td>
<td>${book.bookName}</td>
<td>${book.bookCounts}</td>
<td>${book.detail}</td>
<td>
<a class="btn btn-primary" href="${pageContext.request.contextPath}/book/toUpdateBook/${book.bookID}">修改</a>
|
<a class="btn btn-danger" href="${pageContext.request.contextPath}/book/deleteBook/${book.bookID}">删除</a>
</td>
</tr>
</c:forEach>
</tbody>
</table>
</div>
</div>
</div>
</body>
</html> -
继续编写
BookController.java1
2
3
4
5
6
7
8
9
10
11
12
13
14
15
16
17
18
19
20
21
22
23
24
25
26
27
28
29
30
31
32
33
34
35
36
37
38
39
40
41
42
43
44
45
46
47
48
49
50
51
52
53
54
55
56
57
58
59
60
61
62
63
64
65package com.jokerdig.controller;
import com.jokerdig.pojo.Books;
import com.jokerdig.service.BookService;
import org.springframework.beans.factory.annotation.Autowired;
import org.springframework.beans.factory.annotation.Qualifier;
import org.springframework.stereotype.Controller;
import org.springframework.ui.Model;
import org.springframework.web.bind.annotation.PathVariable;
import org.springframework.web.bind.annotation.RequestMapping;
import java.util.List;
/**
* @author Joker大雄
* @data 2022/6/14 - 15:41
**/
public class BookController {
// 注入service层
private BookService bookService;
// 查询全部书籍
public String list(Model model){
List<Books> books = bookService.queryAllBooks();
model.addAttribute("list",books);
return "allBook";
}
// 跳转到添加书籍
public String toAddBook(){
return "addBook";
}
// 添加书籍
public String addBook(Books books){
bookService.addBook(books);
return "redirect:/book/allBook";
}
// 跳转修改书籍页面
// 使用restful传值
public String toUpdateBook( int id, Model model){
Books book = bookService.getBookById(id);
model.addAttribute("book",book);
return "updateBook";
}
// 修改书籍
public String updateBook(Books books){
bookService.updateBook(books);
return "redirect:/book/allBook";
}
// 删除书籍
// 使用restful传值
public String deleteBook( int id){
bookService.deleteBook(id);
return "redirect:/book/allBook";
}
} -
新建
updateBook.jsp1
2
3
4
5
6
7
8
9
10
11
12
13
14
15
16
17
18
19
20
21
22
23
24
25
26
27
28
29
30
31
32
33
34
35
36
37
38
39
40<%@ page contentType="text/html;charset=UTF-8" language="java" %>
<html>
<head>
<title>修改书籍</title>
<%-- bootstrap CSS--%>
<link href="https://cdn.staticfile.org/twitter-bootstrap/3.3.7/css/bootstrap.min.css" rel="stylesheet">
</head>
<body>
<div class="container">
<%-- 栅格系统--%>
<div class="row clearfix">
<div class="col-md-12 column">
<div class="page-header">
<h1>
<small>修改书籍</small>
</h1>
</div>
</div>
<form action="${pageContext.request.contextPath}/book/updateBook" method="post">
<input type="hidden" name="bookID" value="${book.bookID}">
<div class="form-group">
<label for="bkn">书籍名称:</label>
<input type="text" id="bkn" class="form-control" name="bookName" value="${book.bookName}" required>
</div>
<div class="form-group">
<label for="bkc">书籍数量:</label>
<input type="text" id="bkc" class="form-control" name="bookCounts" value="${book.bookCounts}" required>
</div>
<div class="form-group">
<label for="bkd">书籍描述:</label>
<input type="text" id="bkd" class="form-control" name="detail" value="${book.detail}" required>
</div>
<div class="form-group">
<input type="submit" class="form-control" value="修改">
</div>
</form>
</div>
</div>
</body>
</html> -
测试修改和删除功能,功能实现

ssm整合:新增搜索功能
-
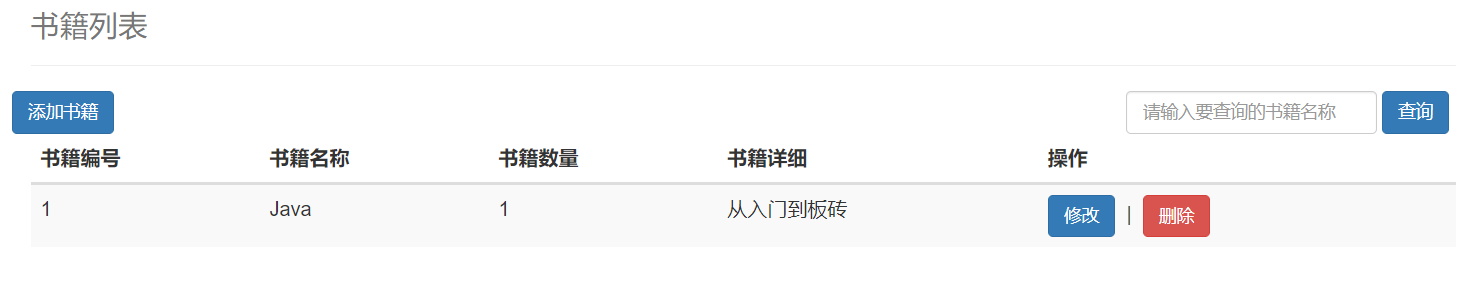
修改
allBook.jsp页面,添加查询1
2
3
4
5
6
7
8
9
10
11
12
13
14
15
16
17
18
19
20
21
22
23
24
25
26
27
28
29
30
31
32
33
34
35
36
37
38
39
40
41
42
43
44
45
46
47
48
49
50
51
52
53
54
55
56
57
58
59
60
61
62
63
64
65
66
67
68
69
70<%@ taglib prefix="c" uri="http://java.sun.com/jsp/jstl/core" %>
<%@ page contentType="text/html;charset=UTF-8" language="java" %>
<html>
<head>
<title>书籍查询</title>
<%-- bootstrap CSS--%>
<link href="https://cdn.staticfile.org/twitter-bootstrap/3.3.7/css/bootstrap.min.css" rel="stylesheet">
</head>
<body>
<%--使用BootStrap 需要导入--%>
<div class="container">
<%-- 栅格系统--%>
<div class="row clearfix">
<div class="col-md-12 column">
<div class="page-header">
<h1>
<small>书籍列表</small>
</h1>
</div>
</div>
<div class="row">
<div class="col-md-4 column">
<a class="btn btn-primary" href="${pageContext.request.contextPath}/book/toAddBook">添加书籍</a>
</div>
<div class="col-md-4 column">
<%-- 查询书籍--%>
<form action="${pageContext.request.contextPath}/book/queryBook" method="post" class="form-inline">
<div style="float: right;margin-right: -380px;">
<input type="text" name="queryBookName" class="form-control" placeholder="请输入要查询的书籍名称">
<input type="submit" class="btn btn-primary" value="查询">
</div>
</form>
</div>
</div>
</div>
<div class="row clearfix">
<div class="col-md-12 column">
<table class="table table-hover table-striped">
<thead>
<tr>
<th>书籍编号</th>
<th>书籍名称</th>
<th>书籍数量</th>
<th>书籍详细</th>
<th>操作</th>
</tr>
</thead>
<tbody>
<%-- 从list中遍历--%>
<c:forEach var="book" items="${list}">
<tr>
<td>${book.bookID}</td>
<td>${book.bookName}</td>
<td>${book.bookCounts}</td>
<td>${book.detail}</td>
<td>
<a class="btn btn-primary" href="${pageContext.request.contextPath}/book/toUpdateBook/${book.bookID}">修改</a>
|
<a class="btn btn-danger" href="${pageContext.request.contextPath}/book/deleteBook/${book.bookID}">删除</a>
</td>
</tr>
</c:forEach>
</tbody>
</table>
</div>
</div>
</div>
</body>
</html> -
修改
BookMapper接口1
2// 通过书名查询
List<Books> queryBooksByName(String bookName); -
修改
BookMapper.xml配置文件1
2
3
4<!--通过书名查询 使用模糊查询-->
<select id="queryBooksByName" resultType="Books">
select * from books where bookName like concat('%',#{bookName},'%')
</select> -
修改
BookService接口1
2// 书名查询书籍
List<Books> queryBooksByName(String bookName); -
修改
BookServiceImpl接口实现类1
2
3
4
5// 通过书名查询书籍
public List<Books> queryBooksByName(String bookName) {
return bookMapper.queryBooksByName(bookName);
} -
修改
BookController1
2
3
4
5
6
7// 通过书名查询书籍
public String queryBook(String queryBookName,Model model){
List<Books> books = bookService.queryBooksByName(queryBookName);
model.addAttribute("list",books);
return "allBook";
} -
测试查询功能
-
小结
SSM的一个基本整合就结束了,之后就是拓展Ajax,拦截器和文件上传下载。
Ajax初体验
简介
- AJAX - Asynchronous JavaScript and XML(异步的 JavaScript 和 XML)
- Ajax是一种不重新加载整个网页的情况下,可以与服务器交换数据并更新部分网页内容。
- Ajax不是一种新的编程语言,而是一种使用现有标准的新方法。
- Ajax不需要任何浏览器插件,但需要用户允许JavaScript在浏览器上执行。
在2005年,Google通过Google Suggest使AJAX变的流行起来,Google Suggest能够自动帮你完成搜索内容的提示和补全。
伪造Ajax
-
新建
springmvc-07-ajax的Module,添加web支持 -
在
web.xml配置springMVC1
2
3
4
5
6
7
8
9
10
11
12
13
14
15
16
17
18
19
20
21
22
23
24
25
26
27
28
29
30
31
<web-app xmlns="http://xmlns.jcp.org/xml/ns/javaee"
xmlns:xsi="http://www.w3.org/2001/XMLSchema-instance"
xsi:schemaLocation="http://xmlns.jcp.org/xml/ns/javaee http://xmlns.jcp.org/xml/ns/javaee/web-app_4_0.xsd"
version="4.0">
<servlet>
<servlet-name>springMVC</servlet-name>
<servlet-class>org.springframework.web.servlet.DispatcherServlet</servlet-class>
<init-param>
<param-name>contextConfigLocation</param-name>
<param-value>classpath:applicationContext.xml</param-value>
</init-param>
<load-on-startup>1</load-on-startup>
</servlet>
<servlet-mapping>
<servlet-name>springMVC</servlet-name>
<url-pattern>/</url-pattern>
</servlet-mapping>
<filter>
<filter-name>encoding</filter-name>
<filter-class>org.springframework.web.filter.CharacterEncodingFilter</filter-class>
<init-param>
<param-name>encoding</param-name>
<param-value>utf-8</param-value>
</init-param>
</filter>
<filter-mapping>
<filter-name>encoding</filter-name>
<url-pattern>/*</url-pattern>
</filter-mapping>
</web-app> -
创建
applicationContext.xml,并配置1
2
3
4
5
6
7
8
9
10
11
12
13
14
15
16
17
18
19
20
21
22
23
<beans xmlns="http://www.springframework.org/schema/beans"
xmlns:xsi="http://www.w3.org/2001/XMLSchema-instance" xmlns:mvc="http://www.springframework.org/schema/mvc"
xmlns:context="http://www.springframework.org/schema/context"
xsi:schemaLocation="http://www.springframework.org/schema/beans
http://www.springframework.org/schema/beans/spring-beans.xsd
http://www.springframework.org/schema/mvc
https://www.springframework.org/schema/mvc/spring-mvc.xsd
http://www.springframework.org/schema/context
https://www.springframework.org/schema/context/spring-context.xsd">
<!-- 1.注解驱动-->
<mvc:annotation-driven/>
<!-- 2.静态资源过滤-->
<mvc:default-servlet-handler/>
<!-- 3.扫描包 controller-->
<context:component-scan base-package="com.jokerdig.controller"/>
<!-- 4.视图解析器-->
<bean class="org.springframework.web.servlet.view.InternalResourceViewResolver">
<property name="prefix" value="/WEB-INF/jsp/"/>
<property name="suffix" value=".jsp"/>
</bean>
</beans> -
编写一个ajax-frame.html使用iframe测试
1
2
3
4
5
6
7
8
9
10
11
12
13
14
15
16
17
18
19
20
21
22
23
<html lang="en">
<head>
<meta charset="UTF-8">
<title>iframe体验无刷新更新页面</title>
<script>
function http(){
let url = document.getElementById("url").value
document.getElementById("frame").src=`${url}`
}
</script>
</head>
<body>
<div>
<p>请输入地址:</p>
<input type="text" id="url">
<input type="button" value="提交" onclick="http()">
</div>
<div>
<iframe id="frame" style="width: 100%;height: 500px;"></iframe>
</div>
</body>
</html> -
使用iframe可以伪造一种ajax的加载效果,但这并不是真正的ajax
jQuery.ajax
- Ajax的核心是
XML HttpRequest对象(XHR)。XHR为向服务器发送请求和解析服务器响应提供了接口。能够以异步方式从服务器获取新数据。 jQuery提供了多个与Ajax有关的方法。- 通过
jQuery Ajax方法,能够使用HTTP Get和HTTP Post从远程服务器上请求文本,HTML,XML或者JSON的同时,还能够把这些外部数据直接载入网页的元素中。 jQuery Ajax的本事就是XMLHttpRequest,jQuery只是对他进行了封装,方便调用。
jQuery在线CDN(Microsoft)
1 | <script src="http://code.jquery.com/jquery-3.4.1.min.js"></script> |
语法
1 | $.ajax(*{name:value, name:value, ... }*) |
属性
| 名称 | 值/描述 |
|---|---|
| async | 布尔值,表示请求是否异步处理。默认是 true。 |
| beforeSend(xhr) | 发送请求前运行的函数。 |
| cache | 布尔值,表示浏览器是否缓存被请求页面。默认是 true。 |
| complete(xhr,status) | 请求完成时运行的函数(在请求成功或失败之后均调用,即在 success 和 error 函数之后)。 |
| contentType | 发送数据到服务器时所使用的内容类型。默认是:“application/x-www-form-urlencoded”。 |
| context | 为所有 AJAX 相关的回调函数规定 “this” 值。 |
| data | 规定要发送到服务器的数据。 |
| dataFilter(data,type) | 用于处理 XMLHttpRequest 原始响应数据的函数。 |
| dataType | 预期的服务器响应的数据类型。 |
| error(xhr,status,error) | 如果请求失败要运行的函数。 |
| global | 布尔值,规定是否为请求触发全局 AJAX 事件处理程序。默认是 true。 |
| ifModified | 布尔值,规定是否仅在最后一次请求以来响应发生改变时才请求成功。默认是 false。 |
| jsonp | 在一个 jsonp 中重写回调函数的字符串。 |
| jsonpCallback | 在一个 jsonp 中规定回调函数的名称。 |
| password | 规定在 HTTP 访问认证请求中使用的密码。 |
| processData | 布尔值,规定通过请求发送的数据是否转换为查询字符串。默认是 true。 |
| scriptCharset | 规定请求的字符集。 |
| success(result,status,xhr) | 当请求成功时运行的函数。 |
| timeout | 设置本地的请求超时时间(以毫秒计)。 |
| traditional | 布尔值,规定是否使用参数序列化的传统样式。 |
| type | 规定请求的类型(GET 或 POST)。 |
| url | 规定发送请求的 URL。默认是当前页面。 |
| username | 规定在 HTTP 访问认证请求中使用的用户名。 |
| xhr | 用于创建 XMLHttpRequest 对象的函数。 |
简单练习
-
编写index.jsp页面,添加ajax请求
1
2
3
4
5
6
7
8
9
10
11
12
13
14
15
16
17
18
19
20
21
22
23
24
25
26<%@ page contentType="text/html;charset=UTF-8" language="java" %>
<html>
<head>
<title>ajax</title>
<!-- jquery-->
<script src="http://code.jquery.com/jquery-3.4.1.js"></script>
<script>
function onblurJQ(){
$.ajax({
url:"${pageContext.request.contextPath}/ajax",
data:{"name":$("#name").val()},
success:function (data){
alert(data);
},
error:function (){
}
})
}
</script>
</head>
<body>
<%-- 失去一个焦点,发起请求(携带信息)到后台--%>
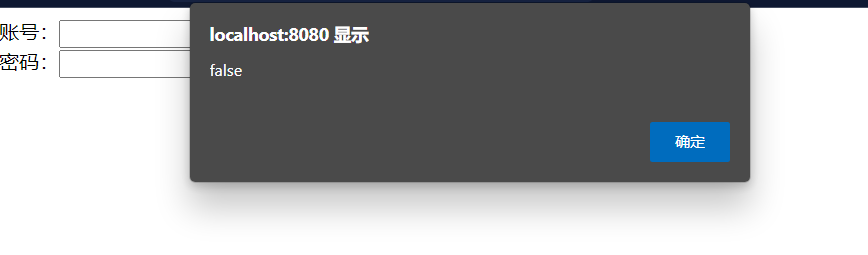
账号:<input type="text" id="name" onblur="onblurJQ()">
</body>
</html> -
编写AjaxController,添加响应
1
2
3
4
5
6
7
8
9
10
11
12
13
14
15
16
17
18
19
20
21
22
23
24
25
26
27package com.jokerdig.controller;
import org.springframework.ui.Model;
import org.springframework.web.bind.annotation.RequestMapping;
import org.springframework.web.bind.annotation.RestController;
import javax.servlet.http.HttpServletResponse;
import java.io.IOException;
/**
* @author Joker大雄
* @data 2022/6/16 - 14:24
**/
public class AjaxController {
// ajax input失去焦点请求
public void ajax(String name, HttpServletResponse response, Model model) throws IOException {
System.out.println("a1:param=>"+name);
if("jokerdig.com".equals(name)){
model.addAttribute("name",name);
}else{
response.getWriter().println("false");
}
}
} -
测试输入框失去焦点,是否弹出信息
-
小结
前端需要掌握的基础内容:
- HTML+CSS+JS(非常熟练)
JS
-
函数(闭包)
-
Dom
-
id,name,tag…
-
create,remove
-
-
Bom
- window,document…
ES6(import,require…)
本博客所有文章除特别声明外,均采用 CC BY-NC-SA 4.0 许可协议。转载请注明来自 Hey,Joker!
- 微信
- 支付宝


相关推荐

评论
ValineTwikoo