【SpringCloud】SpringCloud基础教程(6)
前言:
本文内容:Hystrix:Dashboard流监控、Zuul:路由网关、Config:Git环境搭建
推荐免费SpringCloud基础教程视频:【狂神说Java】SpringCloud最新教程IDEA版_哔哩哔哩_bilibili
Hystrix:Dashboard流监控
-
新建Module为
springcloud-consumer-hystrix-dashboard -
在
pom中添加依赖1
2
3
4
5
6
7
8
9
10
11
12
13
14
15
16
17
18
19
20
21
22
23
24
25
26
27
28
29
30<!-- 实体类+web-->
<dependencies>
<dependency>
<groupId>com.jokerdig</groupId>
<artifactId>springcloud-api</artifactId>
<version>1.0-SNAPSHOT</version>
</dependency>
<dependency>
<groupId>org.springframework.boot</groupId>
<artifactId>spring-boot-starter-web</artifactId>
</dependency>
<!-- 热部署-->
<dependency>
<groupId>org.springframework.boot</groupId>
<artifactId>spring-boot-devtools</artifactId>
</dependency>
<dependency>
<groupId>org.springframework.cloud</groupId>
<artifactId>spring-cloud-starter-netflix-eureka-client</artifactId>
</dependency>
<!-- hystrix-dashboard-->
<dependency>
<groupId>org.springframework.cloud</groupId>
<artifactId>spring-cloud-starter-netflix-hystrix</artifactId>
</dependency>
<dependency>
<groupId>org.springframework.cloud</groupId>
<artifactId>spring-cloud-starter-netflix-hystrix-dashboard</artifactId>
</dependency>
</dependencies> -
新建包
com.jokerdig.springcloud在包下新建主启动类DeptConsumerDashboard_90011
2
3
4
5
6
7
8
9
10
11
12
13
14
15
16
17package com.jokerdig.springcloud;
import org.springframework.boot.SpringApplication;
import org.springframework.boot.autoconfigure.SpringBootApplication;
import org.springframework.cloud.netflix.hystrix.dashboard.EnableHystrixDashboard;
/**
* @author Joker大雄
* @data 2022/8/3 - 15:28
**/
//开启监控
public class DeptConsumerDashboard_80 {
public static void main(String[] args) {
SpringApplication.run(DeptConsumerDashboard_80.class,args);
}
} -
在
resources下新建application.yaml1
2server:
port: 9001 -
打开
springcloud-provider-dept-hystrix-8001并修改主启动类配置1
2
3
4
5
6
7
8
9
10
11
12
13
14
15
16
17
18
19
20
21
22
23
24
25
26
27
28
29
30
31
32
33package com.jokerdig.springcloud;
import com.netflix.hystrix.contrib.metrics.eventstream.HystrixMetricsStreamServlet;
import org.springframework.boot.SpringApplication;
import org.springframework.boot.autoconfigure.SpringBootApplication;
import org.springframework.boot.web.servlet.ServletRegistrationBean;
import org.springframework.cloud.client.discovery.EnableDiscoveryClient;
import org.springframework.cloud.netflix.eureka.EnableEurekaClient;
import org.springframework.cloud.netflix.hystrix.EnableHystrix;
import org.springframework.context.annotation.Bean;
/**
* @author Joker大雄
* @data 2022/8/3 - 11:34
**/
// 启动类
//开启eureka
// 服务发现
public class HystrixDeptProvider_8001 {
public static void main(String[] args) {
SpringApplication.run(HystrixDeptProvider_8001.class,args);
}
// 增加一个servlet
public ServletRegistrationBean hystrixMetricsStreamServlet(){
ServletRegistrationBean registrationBean = new ServletRegistrationBean(new HystrixMetricsStreamServlet());
registrationBean.addUrlMappings("/actuator/hystrix.stream");
return registrationBean;
}
} -
启动9001,7001,hystrix-8001,进行测试
http://localhost:8001/dept/get/1
1
{"deptno":1,"dname":"开发部","db_source":"db01"}
输入:
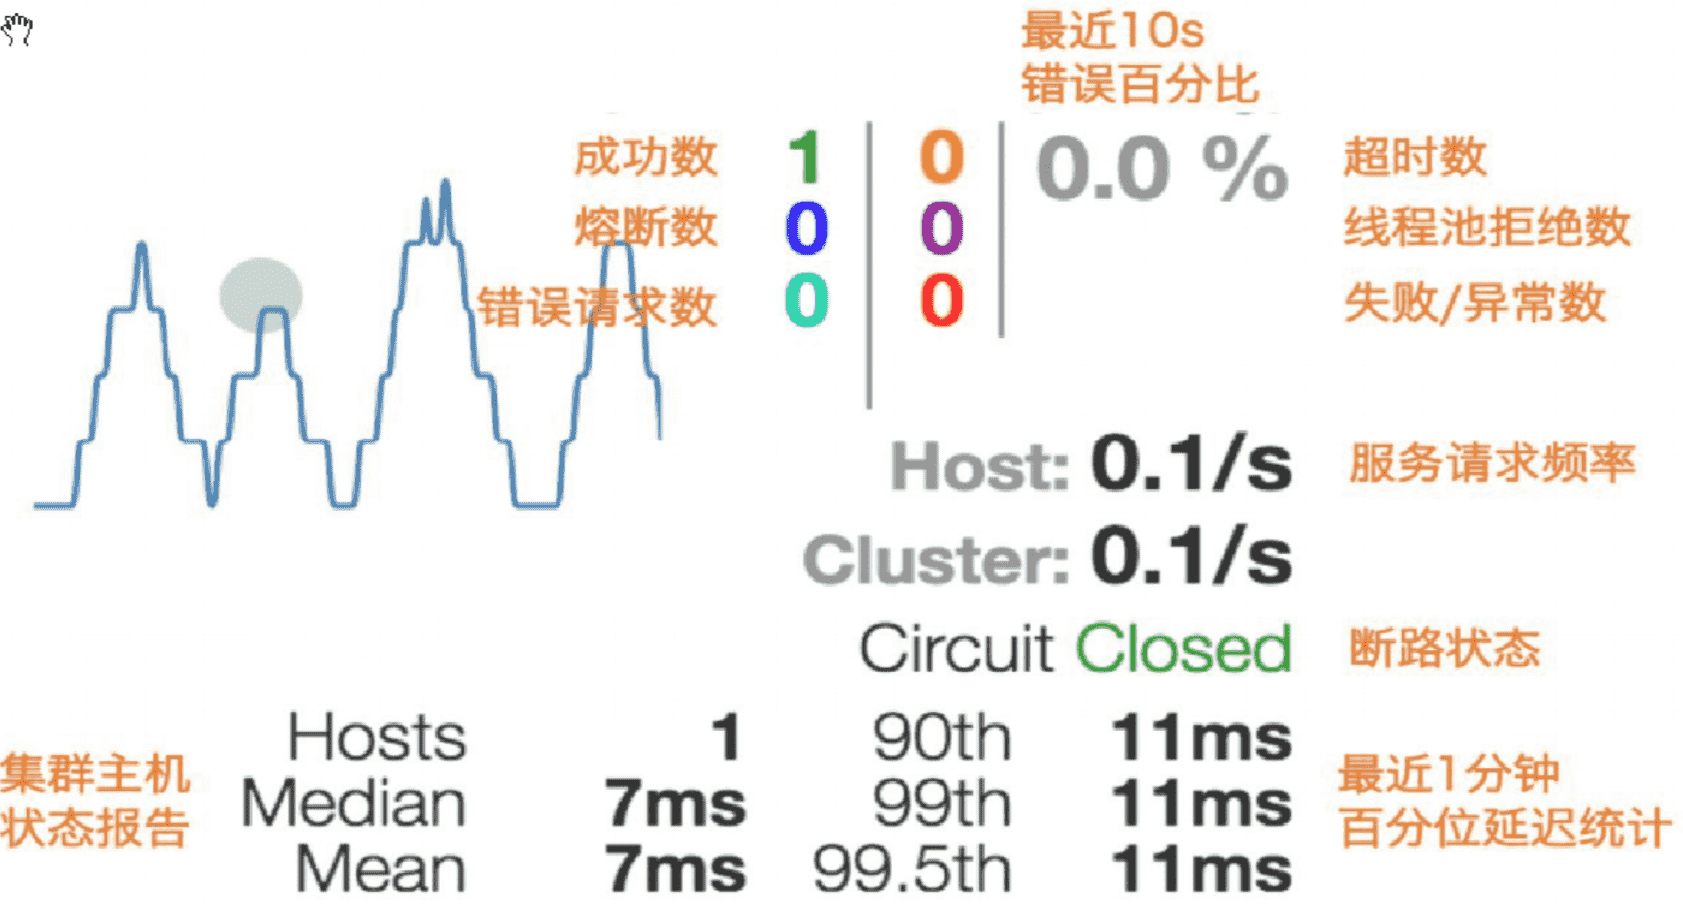
http://localhost:8001/actuator/hystrix.stream
可以看到监控信息页面,每次请求都会被监控。

Zuul:路由网关
什么是Zuul
Zuul是netflix开源的一个API Gateway服务器, 本质上是一个web servlet应用。
Zuul包含了对请求的路由和过滤这两个最主要的功能
其中路由功能负责将外部请求转发到具体的微服务实例上,是实现外部访问统一入口的基础,而过滤器功能则负责对请求的处理过程进行干预,是实现请求校验,服务聚合等功能的基础。Zull和Eureka进行整合,将Zull自身注册为Eureka服务治理下的应用,同时从Eureka中获得其他微服务的消息,也即以后的访问微服务都是通过Zuul跳转后获得
注意:Zuul服务最终还是会注册进Eureka
提供:代理+路由+过滤三大功能。
简单测试
-
新建一个Module为
springcloud-zuul-9527 -
在
pom文件中引入依赖1
2
3
4
5
6
7
8
9
10
11
12
13
14
15
16
17
18
19
20
21
22
23
24
25
26
27
28
29
30
31
32
33
34
35<!-- 实体类+web-->
<dependencies>
<dependency>
<groupId>com.jokerdig</groupId>
<artifactId>springcloud-api</artifactId>
<version>1.0-SNAPSHOT</version>
</dependency>
<dependency>
<groupId>org.springframework.boot</groupId>
<artifactId>spring-boot-starter-web</artifactId>
</dependency>
<!-- 热部署-->
<dependency>
<groupId>org.springframework.boot</groupId>
<artifactId>spring-boot-devtools</artifactId>
</dependency>
<dependency>
<groupId>org.springframework.cloud</groupId>
<artifactId>spring-cloud-starter-netflix-eureka-client</artifactId>
</dependency>
<!-- hystrix-dashboard-->
<dependency>
<groupId>org.springframework.cloud</groupId>
<artifactId>spring-cloud-starter-netflix-hystrix</artifactId>
</dependency>
<dependency>
<groupId>org.springframework.cloud</groupId>
<artifactId>spring-cloud-starter-netflix-hystrix-dashboard</artifactId>
</dependency>
<!-- zuul-->
<dependency>
<groupId>org.springframework.cloud</groupId>
<artifactId>spring-cloud-starter-netflix-zuul</artifactId>
</dependency>
</dependencies> -
在
resources下新建application.yaml1
2
3
4
5
6
7
8
9
10
11
12
13
14
15
16
17
18
19
20
21
22server:
port: 9527
spring:
application:
name: springcloud-zuul
eureka:
client:
service-url:
defaultZone: http://eureka7001.com:7001/eureka/,http://eureka7002.com:7002/eureka/,http://eureka7003.com:7003/eureka/
instance:
instance-id: zuul9527.com
ip-address: true
info:
app.name: jokerdig-springcloud
company.name: jokerdig.com
# zuul
zuul:
routes:
mydept.serviceId: springcloud-provider-dept
mydept.path: /mydept/**
ignored-services: spirngcloud-provider-dept #不能使用该路径访问 "*"为忽略所有
prefix: /jokerdig #设置公共的前缀 -
新建
com.jokerdig.springcloud包,在包下新建主启动类ZuulApplication_95271
2
3
4
5
6
7
8
9
10
11
12
13
14
15
16
17package com.jokerdig.springcloud;
import org.springframework.boot.SpringApplication;
import org.springframework.boot.autoconfigure.SpringBootApplication;
import org.springframework.cloud.netflix.zuul.EnableZuulProxy;
/**
* @author Joker大雄
* @data 2022/8/9 - 11:37
**/
public class ZuulApplication_9527 {
public static void main(String[] args) {
SpringApplication.run(ZuulApplication_9527.class,args);
}
} -
启动7001,hystrix-8001,zuu9527,进行测试
http://localhost:9527/jokerdig/mydept/dept/get/1
1
{"deptno":1,"dname":"开发部","db_source":"db01"}
Config:Git环境搭建
概述
分布式系统面临的配置文件问题
微服务意味着要将单体应用中的业务拆分成一个个子服务,每个服务的粒度相对较小,因此系统中会出现大量的服务,由于每个服务都需要必要的配置信息才能运行,所以一套集中式的,动态的配置管理设施必不可少。SpringCloud提供了ConfigServer来解决这个问题。
SpringCloud config分布式配置中心

Spring Cloud Config为微服务架构中的微服务提供集中化外部配置支持,配置服务为各个不同微服务应用的所有环节提供了一个中心化的外部配置
Spring Cloud Config分为服务端和客户端
服务端也成为分布式配置中心,他是一个独立的微服务应用,用来连接配置服务器并为客户端提供配置信息,加密,解密信息等访问接口。
客户端则是通过指定配置中心来管理应用资源,以及与业务相关的配置内容,并在启动的时候从配置中心获取和加载配置信息,配服务器默认采用git来存储配置信息,这样就有助于对环境配置进行版本管理,并可以通过git客户端工具来管理和访问配置内容。
SpringCloud config分布式配置中心的作用
- 集中管理配置文件
- 不同环境,不同配置,动态化的配置更新,分布环境部署,比如
/dev /test/ /prod /beta /release - 进行期间动态调整配置,不需要在每个服务部署的机器上编写配置文件,服务会像配置中心统一拉去配置自己的信息
- 当配置发生变动时,服务不需要重启,即可感知到配置的变化,并应用新的配置
- 将配置信息以Rest接口的形式暴露
SpringCloud config分布式配置中心与github整合
由于Spring Cloud Config默认使用Git来存储配置文件(当然也支持SVN和本地),推荐使用Git,以
HTTP/HTTPS的形式访问国外推荐:GitHub
国内推荐:Gitee
Git下载地址:Git (git-scm.com)
-
登录
Gitee,新建一个仓库springcloud-config,语言选Java -
下载并安装了Git
-
复制项目的
HTTP地址,使用Git下载选择存放代码的一个文件夹,鼠标右键选择
Git Bash Here1
git clone https://gitee.com/jokerdig/springcloud-config.git
-
项目
springcloud-config就被克隆到本地了,打开创建application.yaml1
2
3
4
5
6
7
8
9
10
11
12
13
14
15spring:
profiles:
active: dev
spring:
profiles: dev
application:
name: springcloud-config-dev
spring:
profiles: test
application:
name: springcloud-config-test -
把
springcloud-config提交到gitee上1
2
3
4
5
6
7
8
9
10
11
12
13
14
15
16
17
18
19
20
21
22
23
24
25
26
27
28
29
30
31# 进入springcloud-config
cd springcloud-config
# 添加
$ git add .
# 查看状态
$ git status
# 这是状态信息 不用输入
On branch master
Your branch is up to date with 'origin/master'.
Changes to be committed:
(use "git restore --staged <file>..." to unstage)
new file: application.yaml
# 提交请求
$ git commit -m "first commit"
# push到gitee上,如果没有配置公钥这里会提示输入账号和密码,输入即可
$ git push origin master
# 提交成功的信息
warning: ----------------- SECURITY WARNING ----------------
warning: | TLS certificate verification has been disabled! |
warning: ---------------------------------------------------
warning: HTTPS connections may not be secure. See https://aka.ms/gcmcore-tlsverify for more information.
Enumerating objects: 4, done.
Counting objects: 100% (4/4), done.
Delta compression using up to 8 threads
Compressing objects: 100% (2/2), done.
Writing objects: 100% (3/3), 310 bytes | 310.00 KiB/s, done.
Total 3 (delta 1), reused 0 (delta 0), pack-reused 0
remote: Powered by GITEE.COM [GNK-6.4]
To https://gitee.com/jokerdig/springcloud-config.git
029e2b8..aadc8c4 master -> master -
gitee上就可以看到我们刚提交的文件
- 微信
- 支付宝